Like most plastics manufacturing processes, injection molding has its share of problems and solutions. Same goes for two-shot injection molding — and there’s even more complexity. The key areas to consider when troubleshooting injection molding defects are captured in our Two-Shot Injection Molding Design Guide. Be sure to download your copy today. In the meantime, here are some common two-shot molding defects – and how to avoid them.
Flash, curling, fraying, and peeling in the shut-off areas
Two-shot injection molding defects often occur in the shut-off areas where the second shot mold seals against the first shot, or the substrate.
Problem: Flash, curling, fraying, and peeling in the shut-off areas.
Cause: Usually a poor seal between the first shot and the second shot mold. Or, the material is too thin in the shut-off area.
Solution: Create a sharp transition between the first and second shot materials in the shut-off areas. To accomplish this, incorporate a step or accent grove into your design:
Step

Incorporate a “step” in the first shot profile to create an abrupt transition between the two materials.
Accent Groove
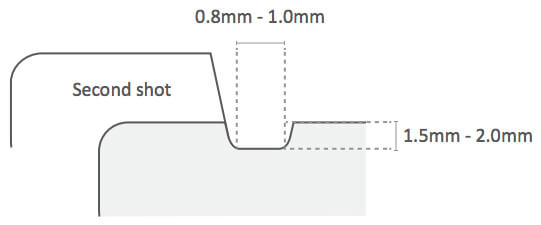
Incorporate an accent groove, 1.5 mm – 2.0 mm deep and 0.8mm – 1.0mm wide, in the first shot profile along the edge of the second-shot.
First-shot substrate vestige and melting
As discussed in our Two-Shot Injection Molding Design Guide, the type of gate, its design, and location must be carefully considered to achieve the ideal cosmetic appearance and dimensions of your part. In single-shot injection molding, the gate is typically located so that the melt enters at the thickest part of the cavity and then flows to the narrower areas. Its placement in two-shot isn’t as straightforward.
Problem: Unwanted material protruding from the gate area on the first-shot substrate.
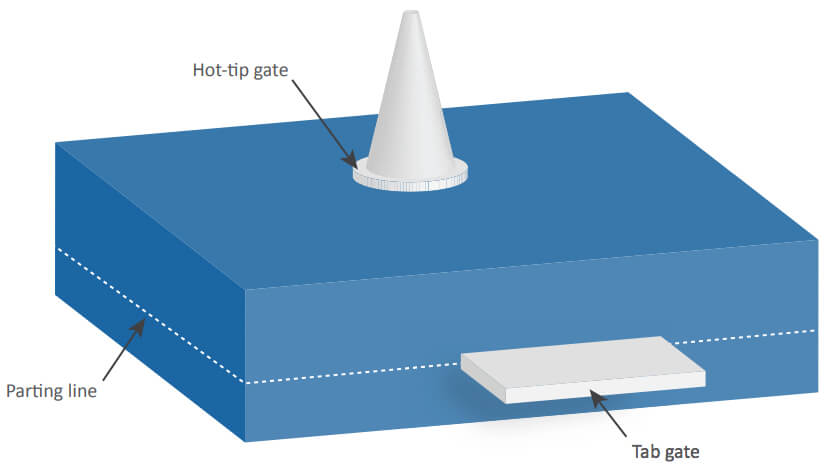
Cause: Unfortunately, all tab gates produce this defect, known as vestige, on the surface of the part. They’re somewhat of a necessary evil.
Solution: The solution to the first-shot vestige is quite simple – position it so that the second shot material covers it! The second-shot vestige, however, will require additional processing after the mold cycle. The only way around the vestige all together is to use a hot tip gate, depending on the part design.
Weak bond between two materials
As for any engineered plastic part, material selection is paramount. Typical considerations include mechanical and physical properties, , heat, electrical, flammability and chemical and UV resistance. For two-shot, if we’re to avoid defects, we must take it a step further and consider the compatibility between the first shot and second shot material.
Problem: The first and second shot materials are coming apart.
Cause: The two materials are not chemically compatible to produce a strong bond.
Solution: There are two solutions to achieving a sufficient bond between the two materials:
If the two materials are somewhat compatible and you simply need to increase the strength of the bond, try maximizing the surface area in the transition zone.

If the two materials aren’t compatible, or if bonding is critical to your application, consider a mechanical bond.

For more tips on choosing the best material, check out our Two-Shot Injection Molding Design Guide.